Next: 5.2.4.6 Filling in OM exposure details in ”Science User Defined Up: 5.2.4 Entering exposure details Previous: 5.2.4.4 Filling in RGS exposure settings
The OM offers imaging and fast modes which can be operated in parallel.
An image will always have to be defined (by means of its central
coordinates and size) while an additional fast mode is optional.
The image mode only produces brightness information for each pixel,
from which a count rate/flux/magnitude for each source in the field can be
derived. These values are averaged over the total exposure time. Higher time
resolution can be obtained for one or two point sources in the field using
the additional fast mode. The highest time resolution is achieved by utilising
an event counting mode. This mode accumulates more data and is therefore
only available for a small region of the detector, corresponding to
![]() arcsec. The additional fast mode is therefore only
feasible for point sources with well-known coordinates.
arcsec. The additional fast mode is therefore only
feasible for point sources with well-known coordinates.
As described in more detail below, both readout modes can be used
simultaneously for the same positions on the chip, thus an image and
a light curve can be obtained at the same time.
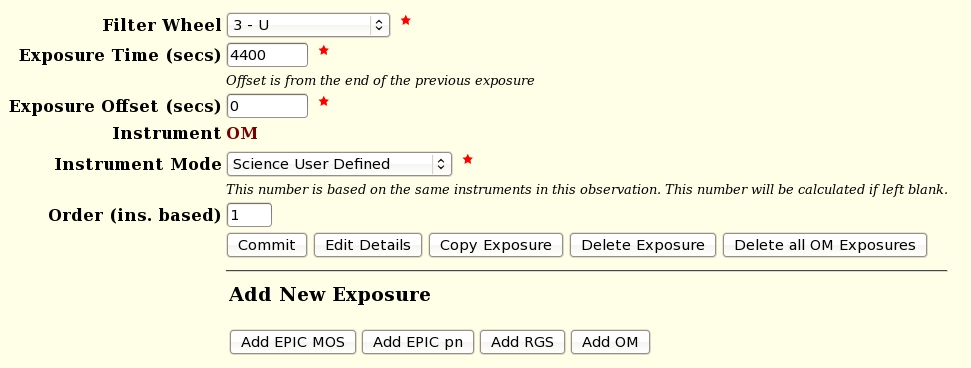
An observation usually includes several OM exposures with different
filters, or with the same filter. Users must choose one of
the OM optical elements
![]() , the exposure time for that optical element, exposure
offset (normally 0 s) and one of the available OM modes
, the exposure time for that optical element, exposure
offset (normally 0 s) and one of the available OM modes
![]() .
Consult the XMM-Newton Users Handbook for a detailed description of the instrument and the
available observing modes. Also take a look at § 3.2
for a description on how to prepare a sequence of different exposures.
A screenshot of an OM exposure form sheet can be seen in
Fig. 17.
.
Consult the XMM-Newton Users Handbook for a detailed description of the instrument and the
available observing modes. Also take a look at § 3.2
for a description on how to prepare a sequence of different exposures.
A screenshot of an OM exposure form sheet can be seen in
Fig. 17.
 |
Since the sequence of exposures using different optical elements must always have increasing filter wheel position numbers1, the three filters mentioned before have to be observed in the following order: U, UVW1 and UVM2.
| Filter wheel position number |
Filter name |
| 0 | BLOCKED |
| 1 | V |
| 3 | U |
| 4 | B |
| 5 | WHITE |
| 6 | VISIBLE GRISM |
| 7 | UVW1 |
| 8 | UVM2 |
| 9 | UVW2 |
| 10 | UV GRISM |
| Science window configuration | Minimum (s) | Maximum (s) |
| Science User Def.: Up to 5 Image windows |
1000 | 5000 |
| Science User Def.: 1 Image + 1 Fast windows |
1200 | 4400 |
| Science User Def.: 1 Image + 2 Fast windows |
1200 | 2200 |
| Science User Def.: 1 to 4 Image + 1 Fast windows |
1200 | 4400 |
| Science User Def.: 1 to 3 Image + 2 Fast windows |
1200 | 2200 |
| Full Frame Low Resolution |
1000 | 5000 |
| Full Frame High Resolution |
1000 | 5000 |
| EPIC/RGS |
1000 | 5000 |
The instrument mode is chosen depending on the target characteristics (size, variability, etc.) and on the available total observation time. Table 7 shows an overview of possible OM modes. It should be noted that a FAST mode window in addition to an image mode window does not affect the integrity of the image.
| Mode Name | Prime Instrument |
| Science User Defined | Any |
| Full Frame Low Resolution | Any |
| Full Frame High Resolution |
Any |
| EPIC Image | EPIC |
| RGS Image | RGS |
| GO OFF |
Any |
All the possibilities are described in detail
in the XMM-Newton Users Handbook, where also some examples are given in Sect. 3.5.9.6
![]() .
.
The user can choose between a user-defined setting and predefined defaults. The user-defined mode is strongly encouraged over the default modes and requires only one extra step to define the central coordinates and size of the read out windows. This is accessed via the "Add Details" button, and described in more detail in the next section § 5.2.4.6.
The default EPIC/RGS Image mode consists of five exposures in which two
science windows are read out. A central 2' x 2' window with the boresight coordinates
in the centre has a higher spatial resolution (0.5 x 0.5 arcsec). An
additional lateral window is read out at 1 x 1 arcsec resolution. In all
five exposures, the central window will always be around the target while
the lateral windows will ultimately cover the entire chip. This is
illustrated in Sect. 3.5.9.2
![]() of the XMM-Newton Users Handbook.
of the XMM-Newton Users Handbook.
Two full frame configurations are available, where the high-resolution mode is not recommended because of excessively large overhead and risk of data loss during downlink.
Important considerations for the choice of mode are, e.g., the source extent and expected variability of the source. If the target is not variable it could be of interest to obtain spectral information performing exposures in different filters. Variability on time scales shorter than 800 seconds, down to 0.5 seconds, can be followed with the FAST mode centred on the source. The FAST mode is offered by selecting the Science User Defined mode. In this mode, two FAST windows can be selected in addition to at least one IMAGE window. Data from IMAGE and FAST windows are acquired simultaneously without extra time consumption or telemetry expenses, and the source will be in the IMAGE and in the FAST window.
An important consideration is the required overhead times before each exposure. A smaller number of longer exposures requires less overhead than a large number of short exposures. A series of short exposures will not deliver a continuous stream of data because of the presence of overhead between exposures.
When selecting to observe with a Grism in Science User Defined Mode the IMAGE window is automatically defined for an optimal extraction of the spectrum of a target.
If V Grism or UV Grism observation of several targets in a field is desired, the "Full Frame Low Resolution" Mode has to be selected. Note: if the field is crowded it may not be possible to separate the spectra of the different objects.
XRPS will read the choice of prime instrument made by the user and will offer in the OM modes pull-down menu only those that are compatible with that prime instrument. Thus, the user will see only part of the configurations/modes from Table 7 listed in the pull-down menu on the screen. When reconsidering the choice of prime instrument AFTER having specified OM exposure details, one must go back and change these entries in compliance with the newly defined prime instrument. Otherwise the exposures are invalid (XRPS will flag an error condition). The use of non compatible filters and modes would give an error message, for instance V GRISM and UV GRISM filters are not compatible with "EPIC/RGS Image" modes.
Note: If the user does not include OM exposures in the observation, then the SOC will consider one of the following approaches: i) to use the available time for OM calibrations, ii) to include OM exposures suited for the particular target, iii) to introduce OM exposures in filters ”UVM2”, ”UVW1” and ”U” in ”Full Frame Low Resolution” mode.
European Space Agency - XMM-Newton Science Operations Centre